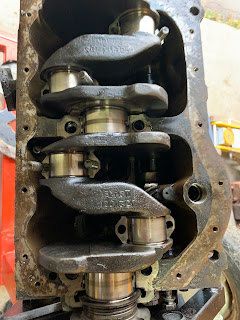
Miguela's seized engine could not be freed in situ. After weeks of soaking, rolling etc I could not get it to budge and resigned myself to the teardown I had suspected was inevitable.
The odometer reads 49000 miles. The "12CD" series engine is original to the car, and it does not appear to have been opened in the past, though it does have a copper-faced head gasket which may not be original.
Some of the photos also show the light green paint colour that is particular to this series of engines. They are rare and particularly fast as a result.
Ease of access is facilitated by the absence of any front end sheet metal. After more hardened mud and grease were removed, the starter, generator, induction and cylinder head were removed. The engine and gearbox were then unbolted and removed. While lifting the engine alone was possible with a helper, an engine hoist will be required for reassembly as the gearbox and engine will be installed as a unit.
The teardown was pretty routine. The oil was dirty but the sump and oil pickup screen contained no surprises, and the journals and bearings appear to be in good shape. They cylinders showed an equal and reasonable amount of carbon build up. Three of four pistons were seized, #2 quite firmly, but these yielded to persistent raps with a mallet and wooden drift. The cumulative friction was certainly too great to have been overcome by any other means.
The clutch and flywheel were clean but the bellhousing is coated with oil. The throwout bearing is cracked.
 |
| Rods are numbered 1-4 starting at front. Rod caps marked for orientation, this mark goes on the left side. |
 |
| Looks undamaged, Whew! |
 |
| Thick washers on short studs, thin on long. |
What's the plan?
Next I will inspect the head and complete the teardown, clean and organize the parts for reassembly, and order the required rebuild parts.
My thinking at this point is :
- new main and rod bearings,
- replace oil seals/gaskets
- re-ring and hone
- new oil and water pumps,
- Rebuild carbs
- add optical points replacement to stock distributor
- replace plug wires and engine mounts.
- upgrade to a spin-on oil filter
- repaint
Questions
- At what stage of reassembly is it best to repaint the engine?
- Is one can of paint sufficient?
- Is primer required?
- Is there a part number cross-reference available for sourcing off the shelf engine parts?
- Where best to buy engine parts? (shipping to Canada).
- Are there any substandard parts or suppliers that should be avoided?
- Is there any reason to replace the timing chain?
- What have I missed?
- Are there any other upgrades I should make at this point? My goal is a reliable street engine.
- is 180 deg thermostat best for summer in Toronto area?
- What is best approach to eliminating points?
- How best to test distributor vacuum advance?
- Are the following upgrades advisable
- convert generator to alternator
- high torque starter
- optical points plate
Parts required - am I missing anything?
Clean and paint
Flywheel and starter
 |
| Is this gear set damaged? |
Factory Dent
I was pondering how the dent occurred in the sump, and happened upon a post at mgexp.com where someone was pondering the identical dent. It was explained that this is a feature of these engines, originally forming a depth-stop for the dipstick. Later engines have a plastic dipstick tube that incorporates a stand-off to accomplish this.
 |
| Miguela’s 12CD-series sump. |
Painting the engine
It is apparently (and somewhat obviously) best to paint the parts separately prior to reassembly, however this poses a minor challenge with mating surfaces on the end plates, and with fasteners.


Comments
Post a Comment