Rebuilding the muffler mount

 So, the muffler - silencer - is located beneath the trunk -boot- floor on the left side of the midget.  The fuel tank is offset to the right to provide space. 

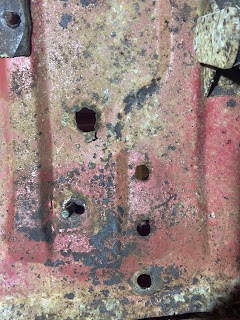
This is the area in which Barnaby has suffered his greatest rust, no doubt helped by the heat.  The original stud appears to have fallen out, and to have been replaced with a bolt in a different location.  As my first mig welding adventure I would like to repair this and replicate (dimensionally at least) the stock setup.   

To do so I need to confirm the original mounting and it’s location.

Top and bottom photos…


And here’s what it should look like:


 Here ya go. From the inside it's just a flat solid washer. Guess it was a stud with the "washer" on it, pushed through the hole and spot welded there. 
Don't really see the spot weld though. Maybe it's just a pushed into a tight hole. Bolt with a washer and some silicon or JB weld would do it. 
5/16 x 24 fine thread, distance from underside of trunk floor to tip is 1.25". 
I'd put another 1/4" on it. As I recall it's none to long for the bushings and washers.”


Thanks Layne!


Comments

Popular posts from this blog

Engine bay dissasembly - reference photos

  Firewall area

Front End Fact Find

June 15 - confirmed that the chassis is not bent!  Plumb bob and chalk lines. See section R page 18 of the Bentley manual for dimensions and method.   Update June 12 - more photos of frame  Update -  Obvious accident damage and clearly the frame horns are not as they should be.  Measurement and verification required.  The photo below is rather telling. The horns should be 12” apart (11” between the flanges), parallel to the car’s centreline and level and straight with respect to its the frame rail.  I am not certain precisely how far each  horn should extend from the crossmember. I will assume but should verify that the rad uprights are at 90deg to the horn, and should verify the height of the rad support above the horn. the threaded bosses for the grill shroud (2 in each horn, 3 in each rad upright) are the most critical location points with respect to hood alignment, as these locate the front end assembly. Straight edge clamped to frame rai...

Engine teardown and reassembly

 Miguela's seized engine could not be freed in situ.   After weeks of soaking, rolling etc I could not get it to budge and resigned myself to the teardown I had suspected was inevitable.  The odometer reads 49000 miles.  The "12CD" series engine is original to the car, and it does not appear to have been opened in the past, though it does have a copper-faced head gasket which may not be original. Some of the photos also show the light green paint colour that is particular to this series of engines.   They are rare and particularly fast as a result.  Ease of access is facilitated by the absence of any front end sheet metal.  After more hardened mud and grease were removed, the starter, generator, induction and cylinder head were removed.  The engine and gearbox were then unbolted and removed.   While lifting the engine alone was possible with a helper, an engine hoist will be required for reassembly as the gearbox and engine will be ...